Don't forget to check the beauty sale pages at Macy's here and
Nordstrom here for new beauty deals plus free shipping!


Thursday, December 23, 2010

Review (with video!): Barry M Instant Nail Effects

Note: before you sigh in frustration that you can't get this in the US (for those of you who don't know, Barry M is a British brand and I received this polish in a swap with Jen of A beauty junkie in London), I remember reading on the lovely Nicole's blog that OPI is going to release a version called Black Shatter for us gals in the US!  The press release says it takes "three minutes" for the crackle to take place, whereas the Barry M polish crackle effect occurs in just seconds (as you're about to see), so I'm not sure it will be an exact dupe. But something's better than nothing, right?


So let's take a look at my video before I show you some swatches of what this little bottle of magic can do! I apologize for the quality of this video but I filmed it on my Blackberry so it was the best I could do. Anyway, check it out:


I deliberately chose four different polish textures, and I tried to keep the colors light so that you could really see the contrast against the black of the Barry M polish. Isn't that just the coolest thing ever?

This is, without a doubt, the nail art for people who can't do nail art! Literally, all you have to do is paint your nails and BAM! You're done.

Here are some swatches taken immediately after I filmed the above video. As you can see, Instant Nail Effects dries to a matte finish:
 (click to enlarge to really see the detail of the crackle)

Now I'd like to show you some "finished" nails (meaning: I took my time painting these and added a layer of top coat after I was done).

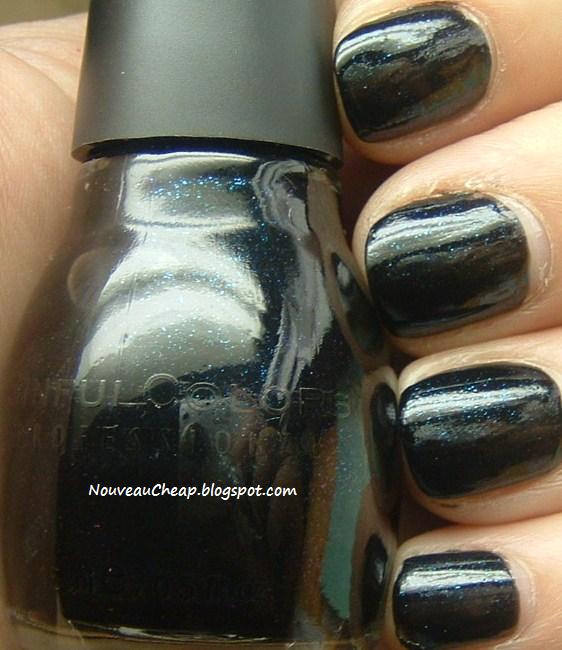
 Barry M Instant Nail Effects layered over Color Club She's So Glam

It's very important for me to note here that in order to get smaller "crackles", I've found that the key is to use the thinnest layer possible, and to not overlap your brush stokes. The areas on my nails where you see larger "crackles" with large spaces inbetween crackles are where I used thicker layers of polish and I overlapped my stokes a bit. So again: if you want small "crackles", use the thinnest layer possible and don't overlap!

Here's one more look:

Barry M Instant Nail Effects layered over Wet n Wild Shield

So what do you think? Is the crackle nail effect for you? Are you thinking about trying to get your hands on a bottle of Barry M Instant Nail Effects, or are you excited to get OPI's version when it comes out? I'd love to hear your thoughts!

Disclosure: Barry M Instant Nail Effects was given to me by A beauty junkie in London. Wet n Wild Shield was given to me on behalf of Wet n Wild for a previous review. Color Club She's So Glam was purchase by me with my own funds.
SHARE:

Wednesday, October 27, 2010

How I paint and clean up my nails: a video tutorial

One of the most frequently asked questions I seem to get on this blog lately is, "How do you get that clean line at the bottom of your nails?". I've tried to explain it a few times in the comments, but I thought it would be easier to just record the process and show it to you that way.

Before you watch these videos, I want to state that, for the record, I am not advising you to use pure acetone. I'm merely showing you what I do, and if you choose to try this yourself, do it at your own risk. Even though the main ingredient in lots of nail polish removers out there is acetone, it can be drying for some, so that's why I always wash my hands thoroughly when I'm done working with acetone. If you use pure acetone, it's not the type of thing you want to leave on your skin afterward because it will dry out your skin and cuticles. So IF you try this method, be sure to wash your hands thoroughly after you're done.

Alternatively, many people opt to use nail polish remover instead of acetone when cleaning up nail polish mistakes. That works too, but for me, acetone is more powerful and much quicker, so that's why I use it. Plus, for my particular skin, it doesn't seem to dry it out too much if I wash my hands thoroughly when I'm done. But I'd just like to repeat: use pure acetone at your own risk. I'm not responsible if your skin dries up and shrivels off! Got it? Good!

Oh! One more thing: I'm not claiming to have created this method myself. I've taken bits and pieces from other bloggers and YouTubers and developed a system that works for me. So please don't go around thinking that I'm claiming to have invented this technique!

Part one:

(Apologies for the grainy quality of these videos but I recorded them on my Blackberry because I don't own a video camera!)

Part two:


And as promised, here's a close-up of the nail I painted in the above videos (obviously I forgot to clean up the top portion of my thumb, so just focus on the line at the bottom!).


As you can see, the brush dipped in acetone really cuts through the polish like a hot knife to butter. This is the easiest, most effective way I've found to clean up my manicures, but if you have a way you'd like to share with us, I'd love to hear about it! Just leave it in the comments or, if you have a blog or YouTube tutorial you'd like to share, leave a link!

I hope this helps some of you to better understand how I get that clean line at the bottom of my nails. If you have any questions or need something explained further, please leave a comment and let me know!
SHARE:

Thursday, July 29, 2010

Red Plum coupons, drugstore clearance tips and more...

Even though I can't stand the sound of my voice, I decided to post another video (two in two days??) because I had a ton of information I wanted to cover today and it would have taken me forever to take pictures, post, write about them, etc.  I hope you don't mind having to watch another video from me, and I promise that this will NOT become the norm on my site. I definitely prefer to write my posts, but again, there was a lot to cover and I didn't have much time (which explains my groggy morning voice in this video!).

So if you can, please take a minute to watch. Oh! And at the bottom of this post I'll include the links to the posts I refer to in this video, in case you want to see them:


Links referred to in the above video:


Bodycology sample

L'Oreal Magic Perfecting Base Review

Prestige Color Creation Eyeshadow & Line Creator Kit Review

Thanks so much for watching, and I hope this helped a bit!
SHARE:

Wednesday, July 28, 2010

New Sinful Colors Love Bite

If you saw my last post about the new Sinful Colors shades (click here if you want to see the pics of the displays) then you know I mentioned that the stand-out shade for me is Love Bite. I had to buy it the minute I saw it. In fact, this shade is so beautiful it compelled me to make a video (more on that in a sec).

First let's take a look at some pics:

Sinful Colors Love Bite (retail: $1.99)

OK, you're probably thinking, "Um, what's the big deal?" And I thought that too, when I first saw this in the display. But it's not just a black polish with teal shimmer. (Actually, is it shimmer, glitter or glass flecks? Who knows...I'm no expert so I'll leave it up to you to decide).

But the above pic was taken with flash, which definitely does not allow for the true magic of this polish to be seen. Let's try florescent light without flash:


Nope, still looks like black with teal sparkles, right?

Well now let's try this baby in sunlight with no flash:

There we go! You can kind of see (only because I deliberately took a blurry picture), the RAINBOW effect of this polish if you look at the bottle. Depending on the angle and the amount of light, the sparkle in this polish shifts from teal to blue to midnight blue to violet to purple and even orange. It's so subtle, yet absolutely stunning!

Here's a close-up of the bottle, which was impossible to take but this was the best I could do:

Can you see how it's blue on the top, and then purple on the right side? It's even more vivid in real life.


After a zillion pictures, I became so frustrated at my inability to truly show you the beauty of Love Bite that I decided to make a video. Granted, it's not much better, but hopefully you can see the colors change a little better. Check it out:


Oh gawd, I just watched the video again and I sound so SAD at the end. It's like I've just given up, huh? Well, this was shot after so many attempts to capture the beauty of this shade that I was just pretty much disgusted that I couldn't nail it. But hopefully you can kind of see what I'm talking about. Maybe? OK, just lie to me and tell me that you can.
SHARE:

Wednesday, August 12, 2009

Review: New Wet n Wild Intuitive Blend Shade Adjusting Foundation + Primer and Wet n Wild Natural Wear Pressed Powder

I mentioned in my Wet n Wild Craze Nail Polish review that I received some awesome, brand new products from Wet n Wild to try, so here is the first of more reviews to come. Let's get started!

Here's the new Wet n Wild Intuitive Blend Shade Adjusting Foundation + Primer:

I received Fair (left) and Light (right).

This product is so cool! Once you squeeze it out, the first thing you notice is that it's white and that there are little beads in the formula:


But once you work it in and crush the beads, the color is revealed:


How cool is that? The color literally adjusts to your skintone and it does so right before your eyes! Here's a quick video demo so you can see the transformation for yourself:


Next we have Natural Wear 100% Natural Pressed Powder. This powder contains some great ingredients like jojoba seed oil, aloe leaf extract and soybean oil. Also, it's paraben-free and the packaging is made from recycled paper:


For me, this powder took some getting use to because it's got a natural scent that smells a little like fresh cut wood. It's not a bad scent at all but just unlike any other powder I've used. But once I got used to the natural scent (which does fade quickly), I really liked the performance of this powder. "Bare" is a great match for my skin (not too yellow, not too pink) and I like how it absorbs the oil on your skin but it doesn't get cakey and it leaves a nice, smooth, matte finish.

Here's a pic of Intuitive Blend, after it's been blended on my hand:


And here's a closer pic after I put the Natural Wear Pressed Powder on top:


Using the powder on top of the foundation seems to really lock the foundation in place. But I should note that these products provide light-to-medium coverage. This is great if my skin isn't acting up, but I have to admit there are some days when I just need heavier coverage and cannot use this combo. But, if you are a person who is blessed with well-behaved skin, I would definitely suggest giving these products a shot. Also, if you regularly use tinted moisturizer in place of foundation, I would definitely suggest you give Intuitive Blend a try. I think you'll probably love it!

Have you tried either of these products yet? I'd love to know your thoughts!

UPDATE--Here is an image from the WnW website with all of the available Intuitive Blend shades:


A sample of this product was given to Nouveau Cheap for editorial purposes, either directly from the manufacturer or from the agency that works on behalf of the manufacturer. All reviews on NouveauCheap.blogspot.com are the honest opinion of its author and gratis samples do not, in any way, affect the outcome of product reviews.


SHARE:

Tuesday, August 4, 2009

Video Review: New Milani Infinite Liquid Eyeliner

Milani Infinite Eyeliner is on the left.

I updated the software on my little ol' Blackberry this weekend and since I now have video capabilities, I thought I'd do a video review of the new Milani Infinite Liquid Liners that everyone seems to be going crazy for these days.

I love the colors (they come in blue, purple, green, bronze and black--I purchased "Forever" which is the shimmery bronze), the staying power and the price ($5.99) but I'm not wild about the application. Here's a video explaining exactly why:


So there you have it! Have you tried these new Milani liners? Thoughts?
SHARE:
© 2009- Nouveau Cheap. All rights reserved.
BLOGGER TEMPLATE MADE BY pipdig